Typo
Corner blends
All I mean is I reduced the height and width where it was flat so the corners stayed constant....instead of scaling I moved the top down, the bottom up and the sides in.
Just select the points from wher the flat sides start and move those.....you can use the arrow key while holding shift.
Make sure in you project properties the snap to scale factor is changed to 0.001
Then near the ends where the corner opened out into the sides and it became eliptical I sorted that out later.
The Shorts has a pretty standard corner radius for the most part so get that square cross section first.
Garry
Shorts 3 views
Moderators: Guru's, The Ministry
-
Garry Russell

- The Ministry
- Posts: 27180
- Joined: 29 Jan 2005, 00:53
- Location: On the other side of the wall
Re: Shorts 3 views
Garry
"In the world of virtual reality things are not always what they seem."
"In the world of virtual reality things are not always what they seem."
-
Garry Russell
- The Ministry
- Posts: 27180
- Joined: 29 Jan 2005, 00:53
- Location: On the other side of the wall
Re: Shorts 3 views
This is the very start of the Freighter
All I have done is slide the selected points down to shape the roof while maitaining the corner radius
Garry
All I have done is slide the selected points down to shape the roof while maitaining the corner radius
Garry
Garry
"In the world of virtual reality things are not always what they seem."
"In the world of virtual reality things are not always what they seem."
Re: Shorts 3 views
AH right!... that makes much more sense, i understand now. Half the trouble is knowing the correct jargon... as with life these days.
in the tutorials, the ones I've been through so far anyway, much of the modeliing starts life as a single tube for example. As the windows that your working in are quite small, it would seem to be easier to make sub assemblies and then put them together. I guess the only issue is making sure they all line up, but does that add to the complexity of the model from an end user perspective. for example, if i were to make a fusalage, nose and tail section separtately and join them, does that make anything harder later on... i.e. repainting, or cause the end model to become heavy on frame rates?
Appreciate all your feedback Garry, I think a lot of people out there who have never tried this before would find these answers helpful.
Ben.


-
Garry Russell
- The Ministry
- Posts: 27180
- Joined: 29 Jan 2005, 00:53
- Location: On the other side of the wall
Re: Shorts 3 views
Sorry Ben
It's difficult sometimes to explain..and I'm not that good at explaining things sometimes.
But rest assured it is...in the end better than it sounds.
I wouldn't worry about windows now
I made ONE window....a seperate solid part
That has become all the cabin windows different sizes and is also the window liners (The thickness of the wall), the top hatch the window in the top hatch and it's liner and the window in the rear roof.
It was also used to make all the fuse perspex except the cockpit.
But worry about that later
I made the fuse in one piece and split it up into seven pieces later.
I suggest again you make a fuse shape and think of splitting later.
Garry
Garry
"In the world of virtual reality things are not always what they seem."
"In the world of virtual reality things are not always what they seem."
Re: Shorts 3 views
No problem Garry, will do. Your explainations are hitting the spot mate.... its very much appreciated. I seem to recall that many models don't have "real" windows in the fusalage, i.e. the widows are just textured (apart from the cockpit obviously.) Is it better practice these days, in something like a 360 or 330 to actually make the windows transparent? I take it there's a significant frame rate hit?
I'll go to bed now and catch you tomorrow for the answer.
thanks matey.
I'll go to bed now and catch you tomorrow for the answer.
thanks matey.
Ben.
-
Garry Russell
- The Ministry
- Posts: 27180
- Joined: 29 Jan 2005, 00:53
- Location: On the other side of the wall
Re: Shorts 3 views
With something small you are I think better with the windows
Systems are more capable now
At one time you could not have transparencies
And since the inside would be seen as close up as you would be to an aircraft like this then certainly
On extra thing though is you will need some sort of interior so the at least something can be seen through the windows.
But when you get to large jets and other transports almost the opposite arguments comes in
You can't see into such a small aperture as you are much further away on the outside and usually the window is smaller in any case..there are a lot of them so that would indeed make the model over complex and poly high............for what?......nothing really.
Best save the polys for details that matter.......a large modern transport will have complex multi action flaps, use the polys on that
This is only my opinion but I think textured windows look better on large aircraft provided they are done correctly. Personally I find at the size and distance you view them they maintain a crispness and are better defined than a hole in the fuse.
One big advantage is that with textured windows all the various window arrangement can be done with a flick of the texture brush..
Simply copy and past to add and delete to remove........ easily moved if in a different position
On the Superfreighter there is going to be at least five models possibly more just to accomodate different window arrangements.
I have had to include missing windows in the structure and then fill them in so when they are opened out the internal liners ect will be in place as I have to modify the interior as well.......In real world they were there but deleted....except the fist Superfreighter that did not have the rear pax cabin windows cut at the time of it's first flight and was still standard 31 there.
There are several different cockpit window arrangements again needing a different model to accomodate properly.
OK so thought out in advance not hard but not as easy as texture and more models to sort out in the config etc.
At the end of the day it depends on many thing other than you personal prefence.
Time factors can be one...simply have you got time to do it and just how much detail you want to include. If a pet project you will want it A1.
For AI versions windows are something that perhaps can be deleted in favour of textures if the flying model is detailed, that is one of many things that can be stripped out for low poly.
So as with most things you will find it's horses for courses and the model itself will scream out the most suitable.
But always transparent cockpit windows as they are big enough to see through/into
I have little experience on model making, so I can't say how much difference it might make on the FPS, but I have on texturing and of course I had to make the model without the windows first so I can vouch for it being more straightforward to just texture, but again, my opinion only, you would be better off windows in this case.
This is really just a generalised opinion based on my perception of FS.
If you did just want to texture they could be made to look OK..just photograph a real one in the correct lighting conditions and use those.
Garry
Garry
"In the world of virtual reality things are not always what they seem."
"In the world of virtual reality things are not always what they seem."
-
Rick Piper

- The Gurus
- Posts: 4776
- Joined: 18 Jun 2004, 17:20
- Location: In front of screen learning 3ds max :/ ...............Done it :)
Re: Shorts 3 views
Hi Ben
You are of course aware that Abacus provide you with a basic shorts 360 model source files in the samples folder ?.
Regards
Rick
Edit: don't bother as it has less polys than a cube
You are of course aware that Abacus provide you with a basic shorts 360 model source files in the samples folder ?.
Regards
Rick
Edit: don't bother as it has less polys than a cube
Re: Shorts 3 views
I've a week off in October... guess what I'll be doing.Edit: don't bother as it has less polys than a cube
There are two that I have quite a bit of info on, both very different, but should be reasonably straight forward to model..... its just the gauges... and textures... and.... :o
Ben.
Re: Shorts 3 views
But Rick - the TRUE LUDDITE will derive masochistic pleasure from adding points and recdreating all those beautiful polygons, one by one....Rick Piper wrote:Hi Ben
You are of course aware that Abacus provide you with a basic shorts 360 model source files in the samples folder ?.
Regards
Rick
Edit: don't bother as it has less polys than a cube
Felix/FFDS
Re: Shorts 3 views
Back again...
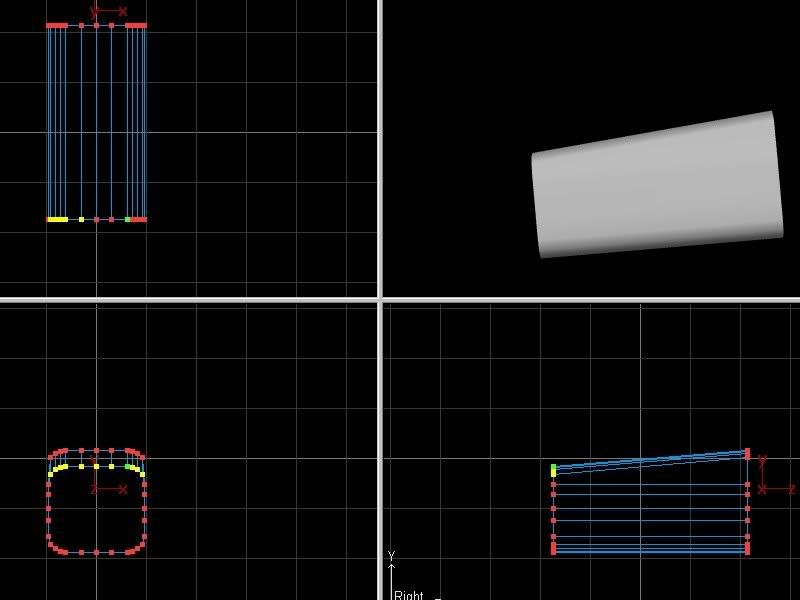
OK, so I'm drawing out my fusalage and I'm turing the tube into a tunnel shape, i.e. with a flat bottom, but its a bugger to make the points sit in the same position on both sides of the cross section. Is there a way to mirror the changes you make on one half of the tube, mirror to the other?
I'd like to mirror changes made to the LHS of this cross section to the RHS. The only way I can find to shape it is to mouse seveck in the back view one of the points and move it causing the latteral crossection to change.
Ben.